


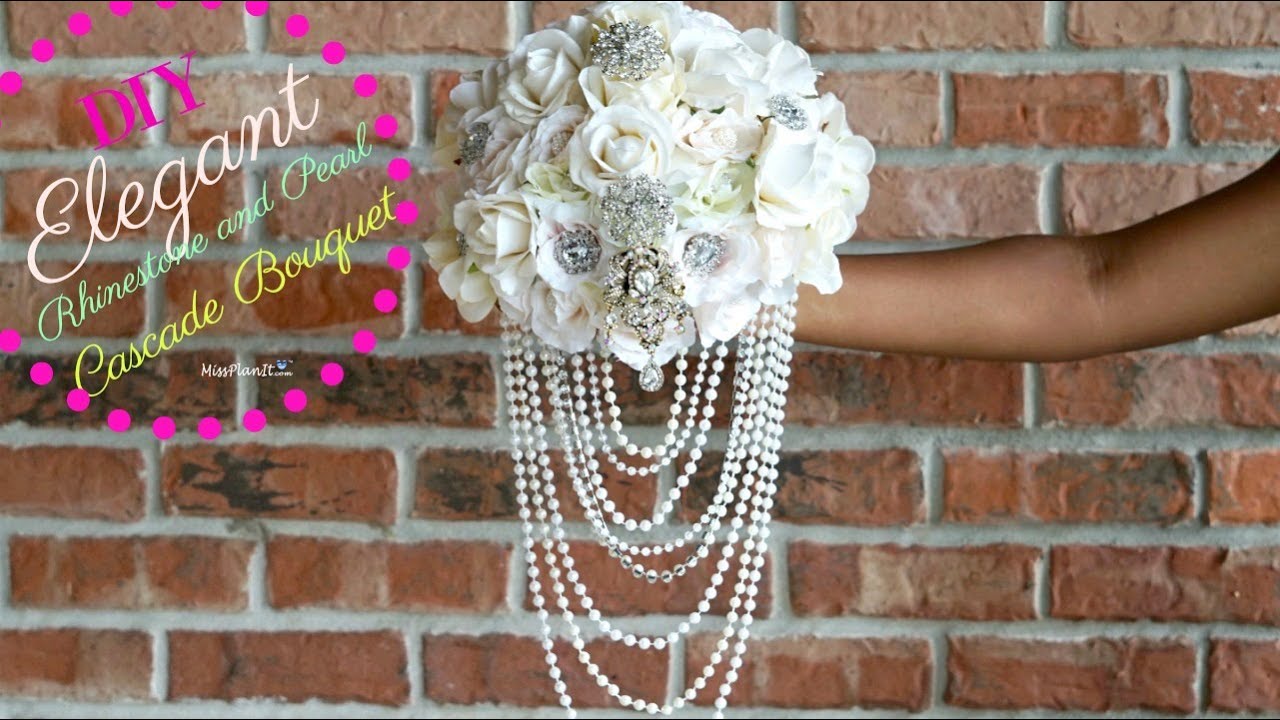
Looking to add a touch of elegance and personalization to your wedding bouquet? Well, look no further! In this article, we'll show you how to make a stunning pearl brooch bouquet that will definitely make a statement on your special day. So, get ready to unleash your creativity and let's dive into the world of DIY floral artistry.
Now, you may be wondering, "How can I make a pearl brooch bouquet?" Don't worry, we've got you covered. Creating your own pearl brooch bouquet is easier than you might think. All you need are some beautiful brooches, pearls, and a little bit of patience. With our step-by-step guide and helpful tips, you'll have a dazzling bouquet that will leave everyone in awe. So, let's get started on this exciting journey of crafting a one-of-a-kind accessory that will make you feel like a true bridal queen. Get ready to shine!
If you're wondering how to make a stunning pearl brooch bouquet, you've come to the right place! Follow these step-by-step instructions to create your own dazzling bouquet:
- Gather your materials, including pearl brooches, floral wire, floral tape, and a bouquet holder.
- Attach the brooches to the floral wire by threading the wire through the pinholes and twisting it securely.
- Arrange the brooches in a desired pattern, making sure to distribute them evenly.
- Wrap the stems of the brooches with floral tape to create a cohesive bouquet.
- Insert the wrapped stems into the bouquet holder, securing them in place.
- Fluff out the brooches to create a full and elegant bouquet.
With these simple steps, you'll have a beautiful pearl brooch bouquet that will add a touch of glamour to any event!
How to Make a Pearl Brooch Bouquet: A Glamorous DIY Guide
Are you looking for a stunning and unique alternative to traditional flower bouquets? Look no further than a pearl brooch bouquet. This glamorous accessory combines elegance and personal style, making it the perfect choice for weddings, special events, or even as a decorative centerpiece. In this article, we will guide you through the steps of creating your own pearl brooch bouquet, from gathering the materials to assembling the final product. Get ready to unleash your creativity and add a touch of luxury to your special day!
Gathering the Materials
To create a pearl brooch bouquet, you will need a variety of materials. Here's a list of what you'll need to get started:
1. Brooches: Look for brooches in various shapes, sizes, and designs. Opt for brooches with pearls or rhinestones to add a touch of sparkle to your bouquet.
2. Floral wire: This will be used to secure the brooches together and create the bouquet's structure. Choose a gauge that is sturdy enough to hold the weight of the brooches.
3. Floral tape: This self-adhesive tape is used to cover the wire and create a seamless look.
4. Ribbon: Select a ribbon that complements the color scheme of your bouquet. This will be used to wrap the handle of the bouquet.
5. Wire cutters: These will come in handy for trimming the floral wire to the desired lengths.
6. Hot glue gun: This will be used to secure any loose brooches or embellishments.
Choosing the Brooches
When selecting brooches for your bouquet, consider the overall theme and color scheme of your event. If you're going for a vintage-inspired look, opt for brooches with intricate designs and antique finishes. For a more modern and sleek bouquet, choose brooches with clean lines and contemporary styles. It's also important to ensure that the brooches are in good condition, with secure clasps and no missing stones.
Once you've gathered all the materials, it's time to start creating your pearl brooch bouquet. Follow the step-by-step instructions below to bring your vision to life:
Step 1: Prepare the Brooches
Before you begin assembling the bouquet, take some time to prepare the brooches. Clean each brooch gently with a soft cloth to remove any dust or debris. If any brooches have loose stones or missing parts, use the hot glue gun to secure them in place.
Step 2: Create the Bouquet Structure
To create the structure of the bouquet, start by cutting several lengths of floral wire. The lengths will depend on the desired size and shape of your bouquet. Take one piece of wire and fold it in half, creating a loop at one end. This loop will serve as the base for attaching the brooches.
Begin attaching the brooches to the looped end of the wire. Insert the pin of each brooch through the loop, securing it in place. Continue adding brooches, spacing them out evenly and alternating directions to create a balanced arrangement.
Adding Filler
To add dimension and fill any gaps in the bouquet, consider incorporating other materials such as silk flowers, feathers, or fabric accents. These can be interspersed among the brooches to create a fuller and more visually interesting bouquet.
Securing the Brooches
As you add brooches, use floral tape to secure the wire and create a seamless look. Wrap the tape tightly around the wire, covering it completely. This will give the bouquet a polished appearance and ensure that the brooches stay in place.
Step 3: Finishing Touches
Once you have attached all the brooches and secured the wire with floral tape, it's time to add the finishing touches to your pearl brooch bouquet.
Start by cutting a length of ribbon, long enough to wrap around the wire handle of the bouquet. Secure one end of the ribbon to the base of the bouquet with hot glue. Wrap the ribbon tightly around the handle, overlapping slightly with each turn. Once you reach the end, secure the ribbon with another dab of hot glue.
Finally, trim any excess wire and ribbon, ensuring that the bouquet is symmetrical and visually appealing. Take a step back and admire your creation. Your pearl brooch bouquet is now ready to be showcased at your special event!
Incorporating a pearl brooch bouquet into your wedding or special occasion adds a touch of timeless elegance. Not only is it a stunning alternative to traditional flower bouquets, but it also serves as a beautiful keepsake that can be cherished for years to come. So, gather your materials, unleash your creativity, and create a pearl brooch bouquet that truly reflects your personal style.
Key Takeaways for "How to Make a Pearl Brooch Bouquet?"
- A pearl brooch bouquet is a beautiful alternative to traditional floral bouquets.
- You can create a pearl brooch bouquet by gathering a variety of brooches and pearls.
- Start by securing a foam bouquet holder and attaching brooches and pearls using floral pins.
- Arrange the brooches and pearls in a balanced and visually pleasing way.
- Finish off the bouquet by wrapping the handle with satin ribbon.
Frequently Asked Questions
Here are some commonly asked questions about making a pearl brooch bouquet:
Q: What materials do I need to make a pearl brooch bouquet?
To make a pearl brooch bouquet, you will need the following materials:
1. A foam or floral bouquet holder
2. Brooches and pearls
3. Floral wire and tape
4. Hot glue gun
5. Ribbon
6. Scissors
7. Optional: additional embellishments like feathers or crystals
These materials can be easily found at craft stores or online.
Q: How do I attach the brooches and pearls to the bouquet holder?
To attach the brooches and pearls to the bouquet holder, follow these steps:
1. Start by wrapping floral wire around the stem of each brooch or pearl. Secure the wire tightly.
2. Insert the wired brooch or pearl into the foam or floral bouquet holder. Make sure it is secure and doesn't wobble.
3. Repeat this process for each brooch and pearl, arranging them evenly throughout the bouquet holder.
4. Use hot glue to secure any loose wires or brooches to the foam or holder, if needed.
Q: How do I arrange the brooches and pearls in the bouquet?
Arranging the brooches and pearls in the bouquet is a creative process. Here are some tips to help you:
1. Start by placing larger brooches or pearls in the center of the bouquet for a focal point.
2. Arrange smaller brooches and pearls around the larger ones, creating a balanced and visually appealing design.
3. Mix different sizes, shapes, and colors of brooches and pearls to add variety and interest to the bouquet.
4. Step back and assess the arrangement as you go, making adjustments as needed.
Q: Can I use other embellishments in addition to brooches and pearls?
Yes, you can definitely use other embellishments in addition to brooches and pearls to enhance your pearl brooch bouquet. Some popular options include feathers, crystals, fabric flowers, or even small pieces of jewelry like earrings or rings. Just make sure to balance the elements and choose embellishments that complement the overall aesthetic of the bouquet.
Remember, the goal is to create a unique and personalized bouquet that reflects your style and preferences.
Q: How do I finish the bouquet with ribbon?
Finishing the bouquet with ribbon adds a polished and elegant touch. Here's how you can do it:
1. Choose a ribbon that matches the color scheme or theme of your bouquet.
2. Cut a length of ribbon that is long enough to wrap around the bouquet holder several times.
3. Starting at the base of the bouquet holder, secure one end of the ribbon with hot glue.
4. Wrap the ribbon tightly around the holder, overlapping slightly as you go. Secure the other end with hot glue.
5. If desired, you can add additional ribbons or bows for extra decoration.
Trim any excess ribbon and make sure all the glue is dry before handling the bouquet.
Final Summary: Create Your Stunning Pearl Brooch Bouquet
And there you have it! You now know how to make a breathtaking pearl brooch bouquet that will leave everyone in awe. This unique and elegant accessory is perfect for weddings, special occasions, or even as a stunning centerpiece. By following these simple steps, you can create a one-of-a-kind bouquet that showcases your personal style and creativity.
Remember to gather all the necessary materials, including a variety of beautiful brooches and pearls. Take your time arranging them in a way that pleases your eye, and secure them tightly to your chosen bouquet base. Don't forget to add your personal touch by incorporating ribbons, lace, or other decorative elements.
Whether you're a DIY enthusiast or simply want to add a touch of glamour to your special day, a pearl brooch bouquet is a fantastic choice. Not only will it make a statement, but it will also serve as a cherished keepsake for years to come. So, go ahead and let your creativity shine as you create your very own stunning pearl brooch bouquet!
Want to learn more about creating beautiful crafts and accessories? Check out our website for more inspiration and step-by-step guides. Happy crafting!


