

Ah, the allure of a pearl bracelet with ribbon! It’s a timeless accessory that adds elegance and sophistication to any outfit. If you’re wondering how to make one yourself, you’ve come to the right place. In this article, I’ll guide you through the steps of creating your very own pearl bracelet with ribbon, so you can showcase your creativity and style. Get ready to embark on a crafting adventure that will leave you with a stunning piece of jewelry!
Creating a pearl bracelet with ribbon is a delightful DIY project that allows you to customize your jewelry to suit your personal taste. Whether you prefer a delicate and dainty design or a bold and eye-catching statement piece, you have the freedom to choose. With just a few materials and some simple techniques, you’ll be able to craft a beautiful bracelet that will catch everyone’s attention. So, let’s dive in and discover the art of making a pearl bracelet with ribbon. Get ready to unleash your inner designer and create a piece that reflects your unique style and personality.
- Start by measuring the ribbon to the desired length for your bracelet.
- Thread the ribbon through a beading needle, and then string the pearls onto the ribbon.
- Continue adding pearls until you reach the desired length, leaving a small length of ribbon at each end.
- Tie a knot at each end of the ribbon to secure the pearls.
- Trim any excess ribbon, and your pearl bracelet is ready to wear!
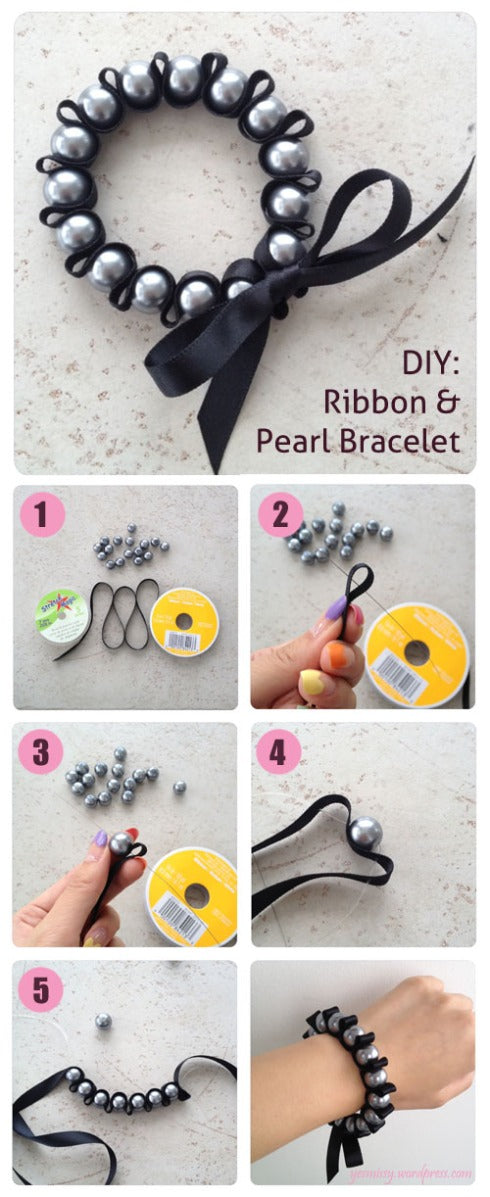
How to Make a Pearl Bracelet with Ribbon: A Stylish DIY Guide
Are you looking to add a touch of elegance and sophistication to your jewelry collection? A pearl bracelet made with ribbon is the perfect choice. Not only does it exude timeless beauty, but it also allows you to showcase your creativity and personal style. In this article, we will guide you through the process of creating your very own pearl bracelet using ribbon. Get ready to embark on a delightful crafting adventure!
Gather Your Materials
The first step in creating a pearl bracelet with ribbon is to gather all the necessary materials. Here’s what you’ll need:
- A length of ribbon (preferably satin or organza)
- Faux or real pearls (choose the size, color, and shape according to your preference)
- Jewelry wire
- Jump rings
- A lobster clasp
- Wire cutters
- Jewelry pliers
Once you have all the materials ready, you can begin the exciting process of making your own pearl bracelet with ribbon.
Creating the Bracelet Base
Start by measuring your wrist to determine the desired length of your bracelet. Add a few extra inches to the measurement, as you’ll need space to tie the ribbon and attach the clasp. Cut the ribbon to the desired length using sharp scissors.
Next, fold the ribbon in half and tie a knot at one end, leaving a small loop. This loop will later be used to attach the clasp. Make sure the knot is secure, as it will serve as the foundation for your bracelet.
Adding the Pearls
Now it’s time to add the pearls to your bracelet. Take a piece of jewelry wire and thread it through one of the jump rings. Slide a pearl onto the wire, leaving a small loop at the end. This loop will allow you to attach the pearl to the ribbon.
Continue threading pearls onto the wire, spacing them evenly and leaving small loops at each end. The number of pearls you use will depend on the desired length and fullness of your bracelet. Once you’ve added all the pearls, cut the wire and create a loop at the other end.
Attaching the Pearls to the Ribbon
Now comes the fun part – attaching the pearls to the ribbon. Take the loops at one end of the wire and thread them through the knot on the ribbon. Pull the loops tight to secure the pearls in place. Repeat this process with the loops at the other end, ensuring that the pearls are evenly distributed along the ribbon.
If desired, you can add additional jump rings between the pearls for added security and flexibility. This will prevent the pearls from sliding too much and help maintain the bracelet’s shape.
Finishing Touches
Once you’ve attached all the pearls to the ribbon, it’s time to add the lobster clasp. Open one of the jump rings and attach it to the loop on the ribbon. Connect the lobster clasp to the jump ring, ensuring that it is securely closed. This will allow you to easily fasten and unfasten your bracelet.
Now, all that’s left to do is trim any excess ribbon and give your bracelet a final inspection. Make sure all the knots are secure and the pearls are evenly spaced. Your beautiful pearl bracelet with ribbon is now ready to be worn or gifted to a loved one.
The Beauty of a Handcrafted Pearl Bracelet
There is something truly special about wearing a piece of jewelry that you’ve created yourself. A handcrafted pearl bracelet adds a personal touch to any outfit and makes a meaningful gift for a friend or family member. By using ribbon as the base, you can customize the bracelet to match your style and preferences. Whether you opt for classic white pearls or experiment with different colors and sizes, your creation will be a unique reflection of your individuality.
Not only is making a pearl bracelet with ribbon a fun and rewarding DIY project, but it also allows you to express your creativity and showcase your craftsmanship. Each time you wear your bracelet, you’ll be reminded of the time and effort you put into creating it. So why not embark on this creative journey and add a touch of elegance to your jewelry collection with a stunning pearl bracelet made with ribbon?
Key Takeaways – How to Make a Pearl Bracelet with Ribbon
- Choose a ribbon color that complements your pearls.
- Thread the ribbon through the first pearl and tie a knot to secure it.
- Continue threading the pearls onto the ribbon, spacing them evenly.
- Once all the pearls are threaded, tie a knot to secure the end.
- Trim any excess ribbon and add a clasp if desired.
Frequently Asked Questions
Here are some commonly asked questions about how to make a pearl bracelet with ribbon:
Q: What materials do I need to make a pearl bracelet with ribbon?
To make a pearl bracelet with ribbon, you will need the following materials:
1. Ribbon of your choice – satin, organza, or grosgrain ribbon works well for this project.
2. Pearls – you can use freshwater pearls, glass pearls, or faux pearls.
3. Beading thread or thin wire – this will be used to secure the pearls onto the ribbon.
4. Scissors – for cutting the ribbon and thread.
5. Needle – if you are using beading thread, you will need a needle to thread the pearls.
6. Clasp – if you want to add a clasp to your bracelet for easy closure.
Q: How do I start making a pearl bracelet with ribbon?
To start making a pearl bracelet with ribbon, follow these steps:
1. Cut a piece of ribbon to your desired length. Make sure it’s long enough to wrap around your wrist comfortably.
2. Thread your needle with the beading thread or thin wire.
3. Tie a knot at the end of the ribbon, leaving a small tail.
4. Slide a pearl onto the needle and thread it onto the ribbon, close to the knot.
5. Continue threading pearls onto the ribbon, spacing them out evenly.
6. Once you have reached the desired length, tie a knot at the end of the ribbon to secure the pearls in place.
7. Trim any excess thread or ribbon.
Q: Can I customize the design of my pearl bracelet with ribbon?
Yes, you can definitely customize the design of your pearl bracelet with ribbon. Here are a few ideas:
1. Add charms or pendants: Attach small charms or pendants to the bracelet for a personalized touch.
2. Mix different sizes or colors of pearls: Experiment with different sizes or colors of pearls to create a unique look.
3. Use multiple strands of ribbon: Instead of using a single strand of ribbon, try using multiple strands for a layered effect.
4. Add other beads or crystals: Incorporate other beads or crystals into the design to add sparkle and texture.
Q: How do I secure the pearls onto the ribbon?
To secure the pearls onto the ribbon, you can use either beading thread or thin wire. Here’s how:
1. If using beading thread, thread the needle and tie a knot at the end.
2. Slide a pearl onto the needle and thread it onto the ribbon, close to the knot.
3. Pass the needle back through the pearl, creating a loop around the ribbon.
4. Continue threading pearls onto the ribbon, securing each one with a loop of thread.
5. If using thin wire, wrap the wire around the ribbon, passing it through the holes of the pearls to secure them in place.
6. Make sure to tie a knot or twist the wire securely at the end to prevent the pearls from coming loose.
Q: Can I add a clasp to my pearl bracelet with ribbon?
Yes, you can add a clasp to your pearl bracelet with ribbon for easy closure. Here’s how:
1. Cut the ribbon to your desired length, leaving extra length for the clasp.
2. Attach one end of the ribbon to one side of the clasp using a jump ring or a small piece of wire.
3. Thread the pearls onto the ribbon as usual.
4. Once you have reached the desired length, attach the other end of the ribbon to the other side of the clasp.
5. Make sure the clasp is secure and can easily be opened and closed.
Final Summary: How to Make a Pearl Bracelet with Ribbon?
And there you have it, a beautiful pearl bracelet made with ribbon! It’s amazing how a few simple materials can come together to create a stunning piece of jewelry. Now, you can proudly wear your handmade creation or gift it to someone special.
Remember, when making a pearl bracelet with ribbon, it’s important to choose high-quality materials and follow the steps carefully. Don’t rush the process and take your time to ensure each pearl is securely fastened.
Whether you’re a beginner or an experienced crafter, this DIY project is a great way to unleash your creativity and showcase your personal style. With just a few basic supplies and some patience, you can create a unique accessory that will turn heads and spark conversations. So go ahead, give it a try, and let your creativity shine through!


